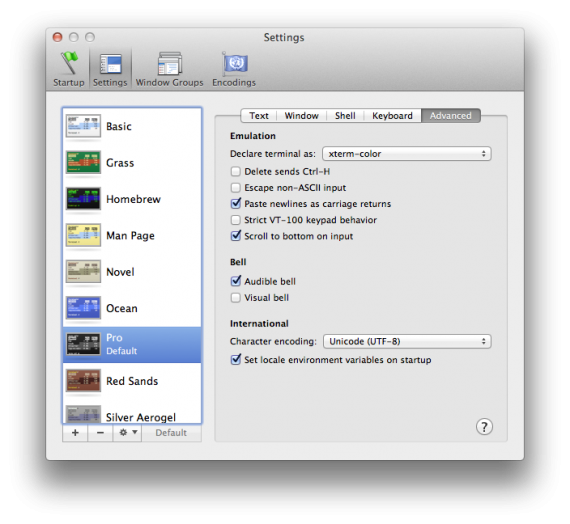
When I upgraded to Lion suddenly my colorful SSH prompts on remote linux machines became dull and black and white. It took me some time to figure out what was going out, so at first I edited my Ubuntu .bashrc file and uncommented force_color_prompt=yes. But this didn’t seem right. So after some digging I found the problem – in Snow Leopard Terminal.app by default was identifying itself as xterm-color, but now in Lion it is xterm-256color, which the remote Ubuntu did not recognize. So to fix it without changing anything on the remote machines, do the following:
- Open Terminal.app Preferences
- Go to the Settings tab
- In your default theme go to the Advanced tab
- On the first line Declare terminal as: select xterm-color, instead of the default xterm-256color
- Reopen Terminal.app and voilà – the colored SSH command prompt is back!
I’ve read lots of forum posts on getting audio through the HDMI interface on an NVidia ION and the solution turned out to be extremely simple: The HDMI output device (labeled as S/PDIF 1) was muted but not visible in Ubuntu’s GUI!
A note about my hardware:
I have a ZOTAC ZBOX HD-ND22, which has NVidia ION chipset and I’m running the proprietary NVidia driver version 270.41.06.
Steps that I took to get HDMI audio:
- Open Sound Preferences
- Open the Hardware tab
- From the Profile dropbox select Digita Stereo(HDMI) Output
- Open up a Terminal
- type alsamixer
- Using the Left/Right arrow keys navigate to the item labeled S/PDIF 1
- Press M and the OO symbol on top should light up in green to denote the channel was unmuted
- Test the audio output via Sound Preferences‘ Test Speakers
In my case the setup worked between reboots.
I’m also having a problem running Ubuntu Unity via HDMI, the screen does not update and the mouse clicks seem to be off by tens of pixels. If you have an idea how to fix that – drop me a line in the comments.
UPDATE: A simple:
unity --reset
will fix unity’s display weirdness I mentioned above
What you need:
Let’s start!
- Install Ubuntu
- After the base system is installed install ssh (always good to have) and ZoneMinder
-
user@ubuntu:~$ sudo apt-get install openssh-server zoneminder - Add the www-data user to the ‘video’ group to access the video streams from the web interface:
user@ubuntu:~$ sudo usermod -a -G video www-data - Make Apache automatically start the ZoneMinder web interface and restart Apache:
user@ubuntu:~$ sudo ln -s /etc/zm/apache.conf /etc/apache2/sites-enabled/001-zoneminder
Password:
user@ubuntu:~$ sudo service apache2 restart - At this point you should be able to open ZoneMinder’s web interface by pointing your browser to http://IP-OF-ZONEMINDER-SERVER/zm/
- Download Cambozola to be able to view the live streams from any Java enabled browser in case the Flash viewer does not work for you:
user@ubuntu:~$ wget http://www.charliemouse.com:8080/code/cambozola/cambozola-latest.tar.gz
user@ubuntu:~$ tar -zxvf cambozola-latest.tar.gz
user@ubuntu:~$ sudo cp cambozola-0.76/dist/cambozola.jar /usr/share/zoneminder/Please note: As of writing this cambozola version 0.76 is the latest one, hence if you get a newer version you should change to the respective directory.
- It’s time to add your cameras – it’s best to first read ZoneMinder’s defining a monitor documentation
- In the very likely event that you get black/blank screen when you try to view the live feed from your camera, then you should change your maximum allowed amount of shared memory and restart Apache and ZoneMinder:
user@ubuntu:~$ sudo echo "256000000" > /proc/sys/kernel/shmmax
user@ubuntu:~$ sudo service apache2 restart
user@ubuntu:~$ sudo service zoneminder restartHow to calculate that magic number (256000000 in my case) is discussed in this thread in the ZoneMinder’s forums. It’s best to read it and calculate the amount yourself, as this is highly dependent on the cameras that you intend to use.
In order to add the change permanently you’ll need to edit /etc/sysctl.conf and add a line kernel.shmmax = 256000000 to it.
If you are still getting no image you should check your cameras and how you set them and experiment with the Device format and Capture palette. - You’re all set!
It might be a good idea to slightly tweak some configuration options. You can do that from the Web Interface’s options menu – it is located in the upper right corner, just below the load/disk-usage monitor and it took me quite a while to find it.
- Options -> Image -> OPT_CAMBOZOLA set to TICKED
- Options -> Image -> STREAM_METHOD set to mpeg
I plan to implement also a Live View monitor so stay tuned for the next HOWTO.
It turns out that migrating a linux box to a new hardware is not as easy task as it used to be. I’m running a Trixbox system on an old 1 GHz Pentium III machine. The owner of the box got another antique – a Dual 1.4 GHz Pentium III ProLiant DL360 G2 with two SCSI drives. So I was tasked with migrating the trixbox to the new hardware. It took me about 20 hours to get this working, but all the work can be done in 3-4 hours, depending on how much data you have. This guide requires you to have a basic knowledge of the linux architecture and the linux commands, as well as what is in the /dev directory. Due to the fact that trixbox is CentOS-based this guide can easily be applied to migrating a regular CentOS installation .
Read the rest of this entry »
