As I’ve always strived to automate my home, as much as I can. Although I can’t still turn the lights on and off, I’m capable of controlling my TV, my set-top-box and my multimedia PC with my iPhone. And the problem with the lights is not so much of “impossible” but rather I don’t feel like tearing down my laws to run cables. I actually managed to write an app for a friend to turn his garden lights on and off with his iPhone.
For that purpose, having my TV remote is essential! Unfortunately, after I upgraded my iPhone 3Gs to 4s, the Samsung Remote app started crashing on each launch. Here’s how I managed to get it working:
- Turn off Wi-Fi and cellular data
- Start Samsung TV
- Go into Demo Play
- Turn back on your Wi-Fi
- Hit refresh
- Select a TV from the list
Since WordPress updated their iOS app to include location for posts, it came to my attention that it is fairly easy to add location to your posts – and it works nicely with the “Quick Photo” feature of the iOS WordPress app.
Unfortunately after I installed the WordPress GeoLocation plugin OnSwipe’s iPad theme stopped working for me. After some digging it turned out it is because Geolocation is overwriting the default alias of $ of jQuery which was breaking OnSwipe.
Here is how to fix that:
- Go to your admin panel
- Go to Plugins -> Editor
- In the drop-down Select plugin to edit choose “Geolocation”
- From the file list Plugin Files (just underneath the drop-down) select geolocation/geolocation.php
- Find in the code the function add_google_maps (use your browser’s search function and look for “function add_google_maps”)
- Find the line that reads:
var $j = jQuery.noConflict();either comment it out by prepending two slashes in front of it or delete it - In its place add the following:
$j = jQuery; - Click Update File
This should fix OnSwipe and at the same time allow your visitor to view the location tag of your posts!
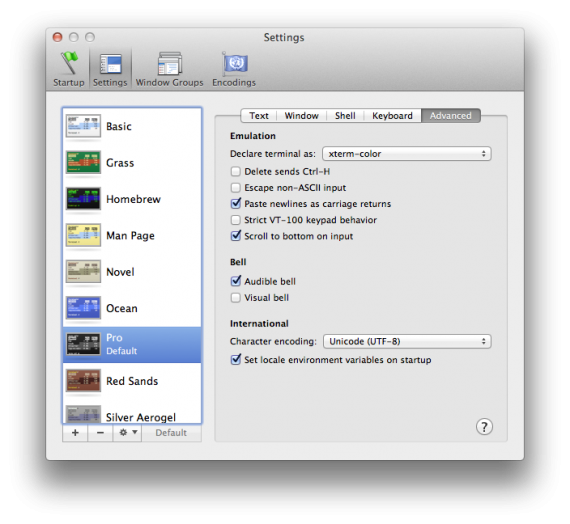
When I upgraded to Lion suddenly my colorful SSH prompts on remote linux machines became dull and black and white. It took me some time to figure out what was going out, so at first I edited my Ubuntu .bashrc file and uncommented force_color_prompt=yes. But this didn’t seem right. So after some digging I found the problem – in Snow Leopard Terminal.app by default was identifying itself as xterm-color, but now in Lion it is xterm-256color, which the remote Ubuntu did not recognize. So to fix it without changing anything on the remote machines, do the following:
- Open Terminal.app Preferences
- Go to the Settings tab
- In your default theme go to the Advanced tab
- On the first line Declare terminal as: select xterm-color, instead of the default xterm-256color
- Reopen Terminal.app and voilà – the colored SSH command prompt is back!
I’ve read lots of forum posts on getting audio through the HDMI interface on an NVidia ION and the solution turned out to be extremely simple: The HDMI output device (labeled as S/PDIF 1) was muted but not visible in Ubuntu’s GUI!
A note about my hardware:
I have a ZOTAC ZBOX HD-ND22, which has NVidia ION chipset and I’m running the proprietary NVidia driver version 270.41.06.
Steps that I took to get HDMI audio:
- Open Sound Preferences
- Open the Hardware tab
- From the Profile dropbox select Digita Stereo(HDMI) Output
- Open up a Terminal
- type alsamixer
- Using the Left/Right arrow keys navigate to the item labeled S/PDIF 1
- Press M and the OO symbol on top should light up in green to denote the channel was unmuted
- Test the audio output via Sound Preferences‘ Test Speakers
In my case the setup worked between reboots.
I’m also having a problem running Ubuntu Unity via HDMI, the screen does not update and the mouse clicks seem to be off by tens of pixels. If you have an idea how to fix that – drop me a line in the comments.
UPDATE: A simple:
unity --reset
will fix unity’s display weirdness I mentioned above
It took me two days to figure out how to initialize a new child record from within the parent model, I hope this helps someone:
I’m using devise for authentication and authorization and using devise built-in controllers. My User model has a child Contact model (Contact belongs_to :User) which contains the user’s names and contact information. I preferred not to initialize the content model on new registration in the view (what’s the point of MVC philosophy if you don’t follow it?).
The solution (in Ruby on Rails 2.3.11) is the after_initialize callback”
class User < ActiveRecord::Base
  has_one :contact, :dependent => :destroy
  accepts_nested_attributes_for :contact, :allow_destroy => true

  # Devise modules will go here

  attr_accessible :contact_attributes

  def after_initialize
    self.build_contact if self.contact.nil?
  end
end
and voilà! Your Contact model will be initialized and thus shown in the view when you use f.fields_for :contact
In my line of work as a web designer/developer I’ve learned to silently detest Internet Explorer, especially version 6, so today I decided to check out the analytics of my web sites, how much of the visitors would I be cutting off if I decide to drop IE6 support for the future. I checked several sites – totally different audience, markets, etc. All showed about the same result – 7% of all total visitors were using IE6, and IE6 was the least used of the IE family. Except for one site which had about 9.6%, but it was targeted at the wider Bulgaria population – demographics that I presume has mostly outdated hardware running XP’s.
I was delighted to see kirichkov.com’s demographics – IE was third, after Firefox and Chrome, with just about 11%! IE6 accounts for just 1.5% of the visits! Yes! This site looks awful in IE6, and NO! I don’t care, if you’re visiting with IE6 you’ll see a friendly greeting informing you that kirichkov.com does not support IE6 and the visitor should upgrade! Also the dominant OS of the visitor is … Linux! Even more joy for my web designer heart! But then again I’m not really surprised, given that 65% of the visits start at my article for ZoneMinder on Ubuntu 10.04!
I surely hope that sometime soon I can get back to my ZoneMinder project and present to you part 2 of the series that will turn the video server into a CCTV terminal!
What you need:
Let’s start!
- Install Ubuntu
- After the base system is installed install ssh (always good to have) and ZoneMinder
-
user@ubuntu:~$ sudo apt-get install openssh-server zoneminder - Add the www-data user to the ‘video’ group to access the video streams from the web interface:
user@ubuntu:~$ sudo usermod -a -G video www-data - Make Apache automatically start the ZoneMinder web interface and restart Apache:
user@ubuntu:~$ sudo ln -s /etc/zm/apache.conf /etc/apache2/sites-enabled/001-zoneminder
Password:
user@ubuntu:~$ sudo service apache2 restart - At this point you should be able to open ZoneMinder’s web interface by pointing your browser to http://IP-OF-ZONEMINDER-SERVER/zm/
- Download Cambozola to be able to view the live streams from any Java enabled browser in case the Flash viewer does not work for you:
user@ubuntu:~$ wget http://www.charliemouse.com:8080/code/cambozola/cambozola-latest.tar.gz
user@ubuntu:~$ tar -zxvf cambozola-latest.tar.gz
user@ubuntu:~$ sudo cp cambozola-0.76/dist/cambozola.jar /usr/share/zoneminder/Please note: As of writing this cambozola version 0.76 is the latest one, hence if you get a newer version you should change to the respective directory.
- It’s time to add your cameras – it’s best to first read ZoneMinder’s defining a monitor documentation
- In the very likely event that you get black/blank screen when you try to view the live feed from your camera, then you should change your maximum allowed amount of shared memory and restart Apache and ZoneMinder:
user@ubuntu:~$ sudo echo "256000000" > /proc/sys/kernel/shmmax
user@ubuntu:~$ sudo service apache2 restart
user@ubuntu:~$ sudo service zoneminder restartHow to calculate that magic number (256000000 in my case) is discussed in this thread in the ZoneMinder’s forums. It’s best to read it and calculate the amount yourself, as this is highly dependent on the cameras that you intend to use.
In order to add the change permanently you’ll need to edit /etc/sysctl.conf and add a line kernel.shmmax = 256000000 to it.
If you are still getting no image you should check your cameras and how you set them and experiment with the Device format and Capture palette. - You’re all set!
It might be a good idea to slightly tweak some configuration options. You can do that from the Web Interface’s options menu – it is located in the upper right corner, just below the load/disk-usage monitor and it took me quite a while to find it.
- Options -> Image -> OPT_CAMBOZOLA set to TICKED
- Options -> Image -> STREAM_METHOD set to mpeg
I plan to implement also a Live View monitor so stay tuned for the next HOWTO.
A day after the iOS 4 was released I upgraded my iPhone 3Gs to benefit from all the new features. I was delighted with the new Cellular Data switch – it allowed my iphone to be a real phone and last for days not merely hours, all due to the GPRS/3G not abusing the battery.
Unfortunately one of the “features” in iOS4 turned out to be an even worse battery abuser – the persistent Wi-Fi. While I was at home or in the office – about 20 hours of my average day – the phone was constantly connected to the Wi-Fi and the battery lasted for 15-16 hours tops, with no more than an hour of actual usage!
So far there is no “Persistent Wi-Fi” switch, so I set on finding out what caused this behavior, and here is what you need to do to get it off:
- Disable notifications (yes, no more knowing when someone wrote on your Faceboko wall or mentioned you on twitter)
- Disable any Push e-mail, from the list of e-mails (Exchange, GMail, Yahoo, etc.), not just the Push switch in Settings -> Mail -> Fetch New Data!
If you are using Exchange (or Gmail/Google Apps) you’ll also need to disable your calendar and contacts unfortunately. In other words you have to switch to IMAP/POP e-mails.
This feature, unfortunately, makes you chose between having Push e-mail and notifications or manually turning on and off the Wi-Fi every time you need it, just like those nasty Symbian phones, the iPhone claims to be superior to!
UPDATE: after ten days I have to admit – I was wrong. Probably one of those nasty background-running apps was keeping the Wi-Fi connected at all times. Now I close most of my apps after I’m done with them and battery indeed lasts for 2 days and about 3 hours of use! Cheers!
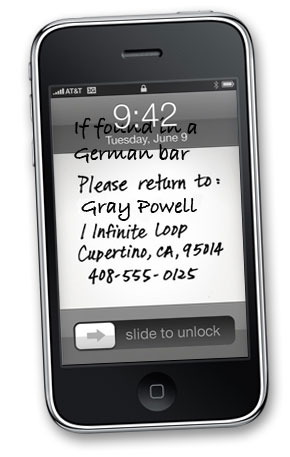
They should’ve removed that image on apple.com:

from the Apps for travelling, apps for losing your iPhone prototype page.
Or else I wouldn’t be able to do this:


